Translate this page into:
A new device for measuring orthodontic compressive bonding force; a novel bracket positioning gauge with a force sensor

*Corresponding author: Mahesh Jain, PhD Scholar, Assistant Professor, Department of Orthodontics and Dentofacial Orthopedics, AMC Dental College and Hospital, Ahmedabad, Gujarat, India. doctormaheshjain@gmail.com
-
Received: ,
Accepted: ,
How to cite this article: Jain M, Patel D. A new device for measuring orthodontic compressive bonding force; a novel bracket positioning gauge with force sensor. APOS Trends Orthod 2022;12:230-5.
Abstract
Objectives:
The optimum adhesive thickness present between bracket base and tooth surface plays an important role in achieving ideal treatment outcome in straight wire technique. As thickness of adhesive largely depends on amount of force applied while bonding an orthodontic brackets on the tooth surface. Therefore, it becomes prudent to find direct and accurate method to quantify the bonding force. The aim of this paper was to describe the design and working of novel bracket positioning gauge with force sensor which directly quantifies the amount of bonding force applied by orthodontists.
Material and Methods:
The present prototype is a bracket positioning gauge where load cell and vertical stopper blade are fixed on base platform. The force sensing blade attached to load cell detects the force applied and transmit to load cell which converts compressive force into an analogue signals. These inputs are then converted into digital signals for further processing. The prototype was tested five times by ten orthodontists for measuring bonding force while orthodontic brackets were bonded on extracted premolars. The same procedure was repeated after seven days to assess the reproducibility and reliability of prototype.
Results:
The majority of orthodontists participated in present study applied bonding force between the ranges of 50-200 grams with the mean bonding force applied by participant orthodontists was similar in time interval of seven days with 134.67 grams and 132.76 grams respectively.
Conclusion:
The novel bracket positioning gauge with force sensor was able to measure compressive bonding force accurately and can aid in achieving optimum adhesive thickness for clinically acceptable bond strength. The present innovation needs further refinements to be more useful in clinical settings.
Keywords
Bracket positioning gauge
Orthodontic bonding
Force sensor
INTRODUCTION
In contemporary orthodontics, it is very important to ensure a uniform consistent layer of composite is placed under each bracket to take full advantage of the pre-adjusted edgewise system; thereby avoiding the need for compensatory bends to be placed in the archwire.[1] As improper adaptation and variation in bonding force level while the placement of the bracket on the tooth surface results in an uneven thickness[2] of adhesive. Thus, uniform thickness of adhesive not only helps in achieving better treatment outcomes, but also reduces the treatment duration by minimizing the need for finishing and detailing during the end of treatment. However, the effect of adhesive thickness beneath the bracket base and the contact compressive force used while bonding the bracket to the tooth largely remained unstudied.
Although, the thickness of adhesive largely depends on the amount of force applied during the bonding of an orthodontic bracket. Still, there is no optimum or ideal bonding force mentioned in literature other than advocating the application of gentle force[3] to get the uniform thickness of adhesive. However, few researchers in past have studied the effect of bonding force which widely varied from 50 g to 1000 g. Goto et al.[4] reported that increasing the contact compressive force caused a significant reduction in adhesive thickness and shear bond strength. However, Jain et al.[5] in 2013 noted that an increase in bonding force tends to increase shear bond strength initially to a specific thickness and later on it decreases with a decrease in film thickness.
It is important to note that the previous studies[4-9] have used indirect methods to apply compressive bonding force while seating bracket on the tooth surface. Hence, the results of these studies have to be considered with caution; as there was no specialized orthodontic instrument used in the past that can measure bonding force directly and accurately while positioning a bracket on tooth surface. Hence, it becomes prudent to find a direct and accurate method to quantify the bonding force needed to achieve optimum adhesive thickness for clinically acceptable bond strength.
Hence, this paper aimed to describe the novel bracket positioning gauge with a force sensor that quantifies the amount of bonding force applied by orthodontists while accurately positioning an orthodontic bracket to the tooth surface.
MATERIAL AND METHODS
Load cells [Figure 1] are basically a type of force transducers that converts the kinetic energy of a force such as compression into a measurable electrical signal.[10,11] The strength of the signal changes in proportion to the force applied. The body of the load cell is slightly deformed when pressure is applied but it always returns to its original shape unless heavy force is used. In response to the body shape changes, the strain gauges also change shape.[10,11] This, in turn, causes a change in the electrical resistance of the strain gauge which can then be measured as a voltage change. Since this change in output is proportional to the amount of weight applied, the weight of the object can then be determined from the change in voltage. This concept of load cell was used to design and fabricate bracket positioning gauge where load cell helps to detect and measure the applied bonding force while seating bracket on the tooth surface.

- Load cell.
Novel bracket positioning gauge with force sensor
The present device as shown with schematic diagram [Figure 2] and the novel bracket positioning gauge [Figure 3] consists of four components that are assembled together to form a single unit. The present innovation consists of a load cell [Figure 1] which is commercially available (Xiamen Loadcell Technology Co., Ltd. China) with dimensions length of −110 mm, width of −6 mm, and height of 33 mm [Table 1] and three customized parts, namely, force-sensing blade, vertical alignment blade and base platform [Figure 4].
| Brand | LAK-B |
|---|---|
| Form | Beam type, single point |
| technology | Strain type |
| Output signal | analogue |
| Other characteristics | High-precision, aluminum alloy |
| Dimensions | 110 × 10 × 33 mm |
| Rated load | Max. 600 g |
| Manufacturer | Xiamen Load cell Technology Co., Ltd. China China) |
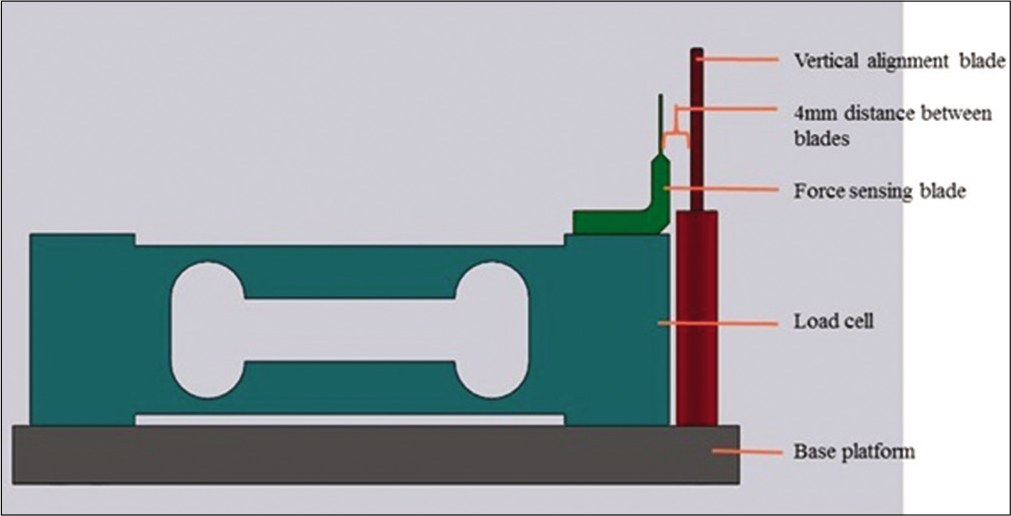
- Schematic diagram of device.
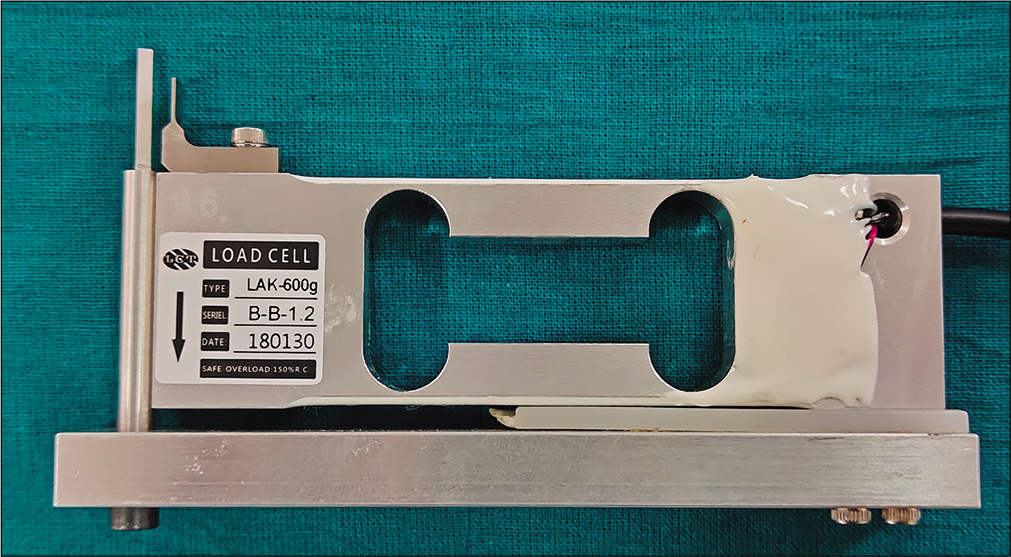
- Novel bracket positioner gauge with force sensor.
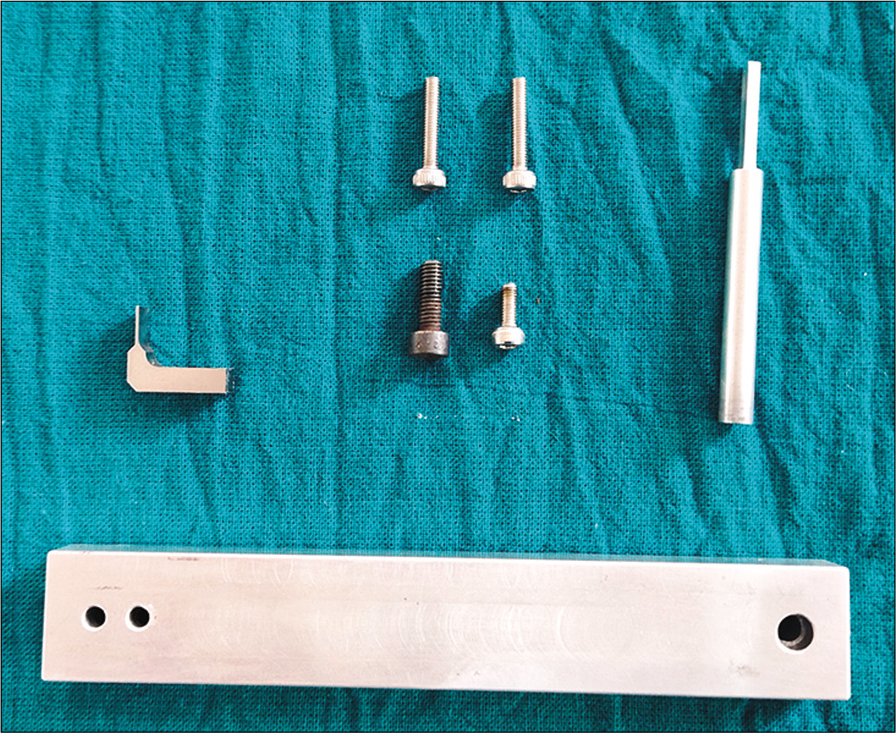
- Customized parts of new device.
Customized parts of bracket positioner gauge
Base platform/bottom plate
It is made up of aluminum alloy with dimensions as the length of −125 mm, the width of −20mm, and the height of 10 mm as shown in [Figure 4] where all customized parts are separately placed. The purpose of this platform is to provide a base to attach other parts of the proposed instrument and also helps to hold the instrument while bonding.
Force sensing blade
It is made up of surgical grade 304 stainless steel alloys and consists of a horizontal arm of 13.5 mm in length, 5 mm in width, and 4mm in height. The horizontal arm is attached to the load cell with a screw and then continues as a vertical arm with a terminal portion ends as a thin blade with (4 mm × 5 mm × 0.5 mm). The thin blade is inserted into the bracket slot which serves as a bracket positioning gauge and detects the amount of force applied. The force generated in the blade gets transmitted to the load cell.
Vertical alignment blade
The initial portion is round in cross-section with a diameter of 5.5 mm and length of 41mm and is attached to the base platform with a screw. The latter half is square in cross-section as 2 mm × 2 mm with a length of 18 mm. The pin is fixed 4 mm away from the force-sensing blade to facilitate the bracket to be positioned 4 mm from incisal or cuspal tip in a vertical plane.
Working principle
During the bonding procedure, as the force measuring blade is pressed against the orthodontic bracket slot for precise vertical bracket positioning, the force generated will be detected and measured by the force measuring blade and then transmitted to the load cell. The vertical stopper is provided to stop the vertical movement of the bracket positioned at the desired position. The force transmitted is then processed by ArduinoUno circuit [Figure 5].[12,13] Arduino boards are able to read inputs on a sensor, a finger on a button, and turn them into an output. It is an open-source microcontroller board where the board is equipped with sets of digital and analog input/ output (I/O) pins that may be interfaced to various expansion boards (shields) and other circuits. It can be powered by a USB cable which accepts voltages between 7 and 20 volts.
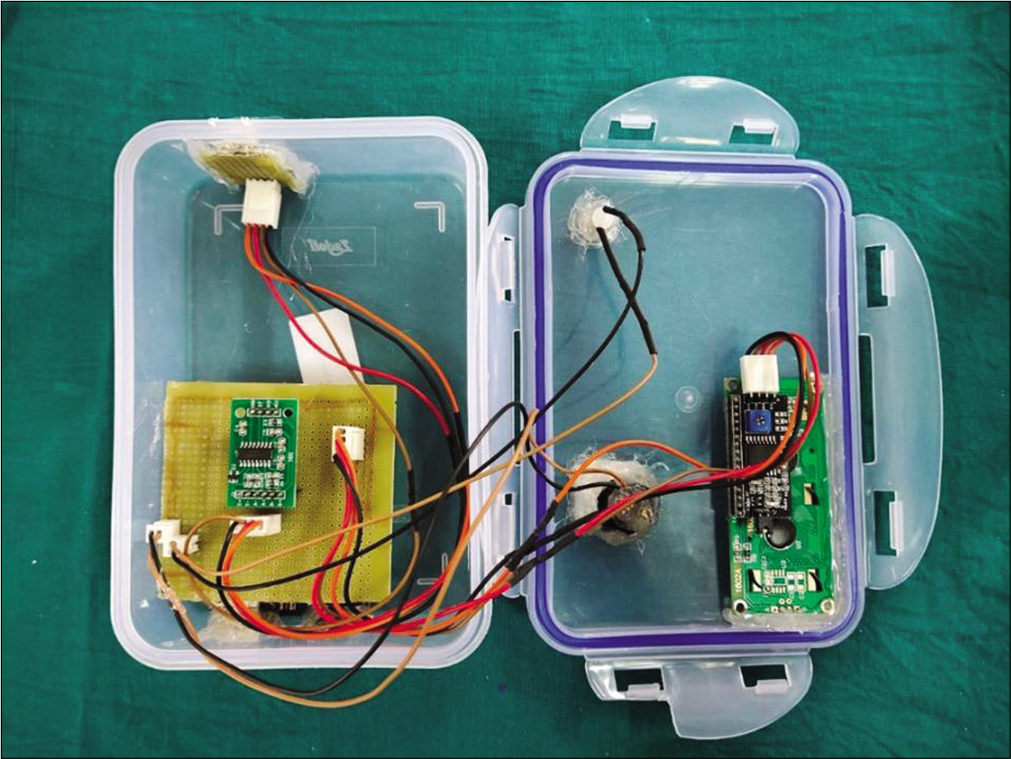
- Arduino circuit (inner view).
Overall mechanism
In this device, force applied while seating bracket on the tooth using force sensing blade act as input, and then this applied force is detected by load cell as analog signals is depicted in form of flow chart of working principle [Figure 6] of the device. These analog signals are then converted into digital signals with the help of a 14 × 711 module analog-digital converter. Thereafter, these converted digital data are processed by ARDUINO-UNO circuit[12,13] into some quantifiable values. Thus, this ARDUINO circuit [Figures 5 and 7] works similarly to the CPU unit of a computer.
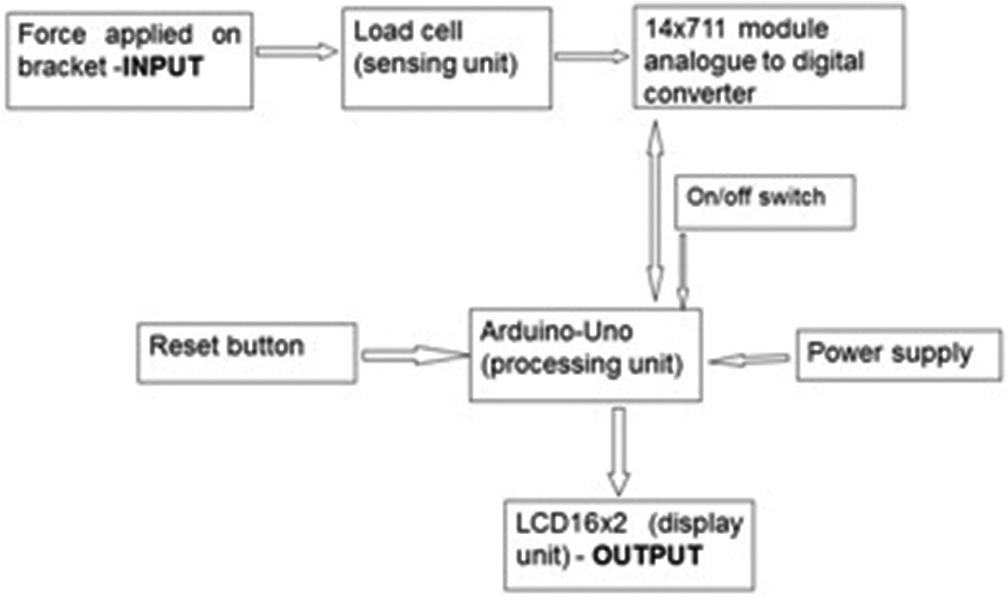
- Working principle.
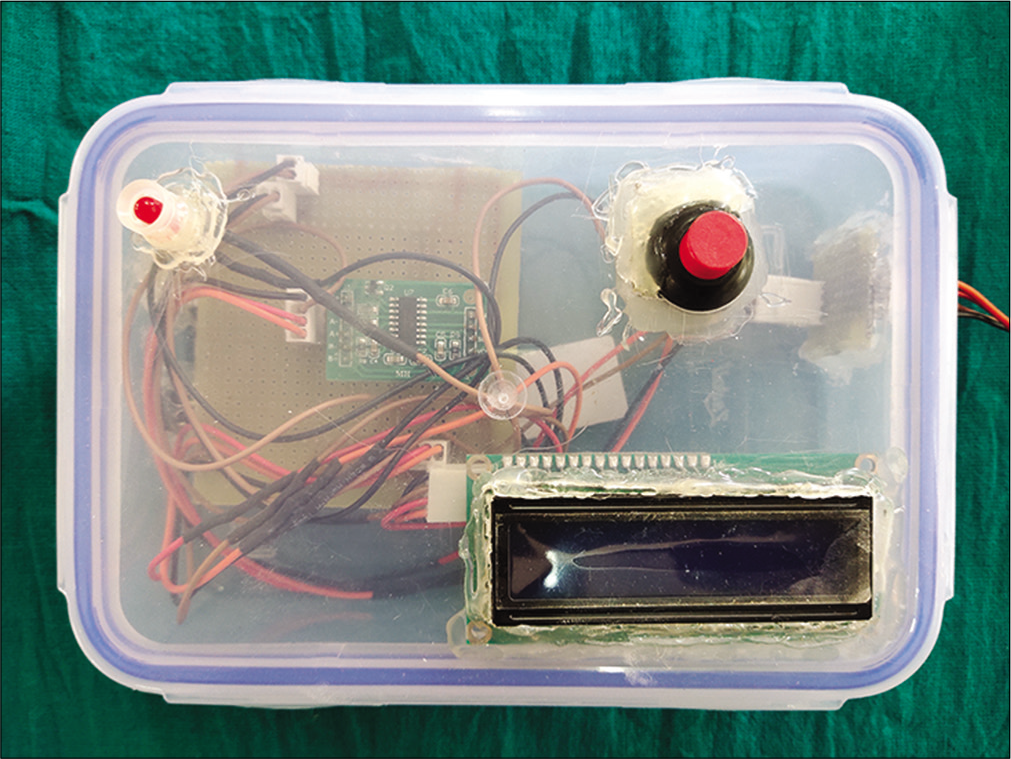
- Display unit with Arduino circuit.
These digital signals which were converted to quantifiable values are displayed in LCD as output. The red-colored reset button [Figure 7] is also added to the circuit which is activated after every use to remove any residual forces or stresses which get imbibed into the load cell when left unused. Hence, the reset button redirects the circuit to remove residual stresses which exist due to unknown or environmental factors by sending the negative feedback to the load cell via a digital convertor. Therefore, the reset button helps to achieve accurate reading every time we use the device for measurement. The load cell used in this prototype can measure force levels up to 600 grams. Hence, the whole assembly [Figure 8] comprised a new device that is connected to a circuit with a display and powered by an AC-DC adaptor.
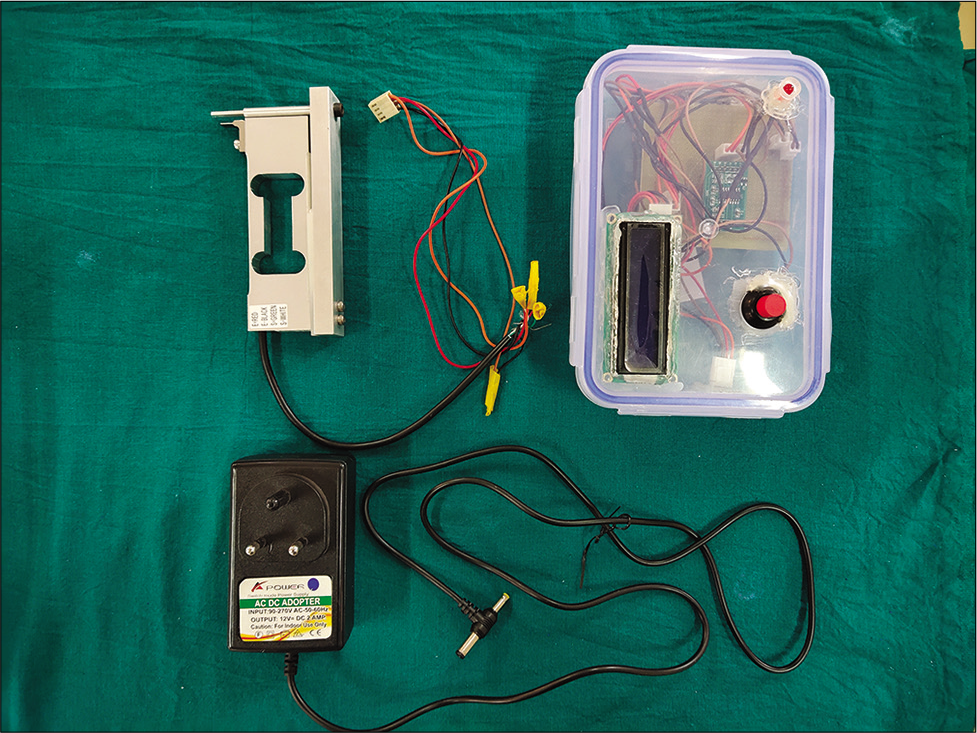
- Whole assembly.
The research proposal was approved by the Institutional ethics committee. A newly designed orthodontic bracket positioning gauge with a force sensor was used to bond the orthodontic bracket on premolars extracted for orthodontic purposes. The extracted premolars were mounted on acrylic blocks which makes the sample firm and stable while performing the procedure. The present prototype was tested for accuracy and reproducibility by ten orthodontists comprised of (six males and four females) with a mean of 5 years of experience (range, 1–11 years). Participating orthodontists were trained in the working of a newly developed gauge with a force sensor and have performed bonding procedures as per standard practice [Figures 9-11]. Every orthodontist was instructed to bond brackets on extracted premolars using a newly designed gauge 5 times to assess the accuracy and reproducibility of measured bonding force (T1). As the amount of force applied was stable in less than a second, the force after 2 s was noted in this study. The whole experiment was repeated by the same group of ten orthodontists after 7 days (T2) to assess the accuracy and reproducibility of the novel bracket positioner gauge.
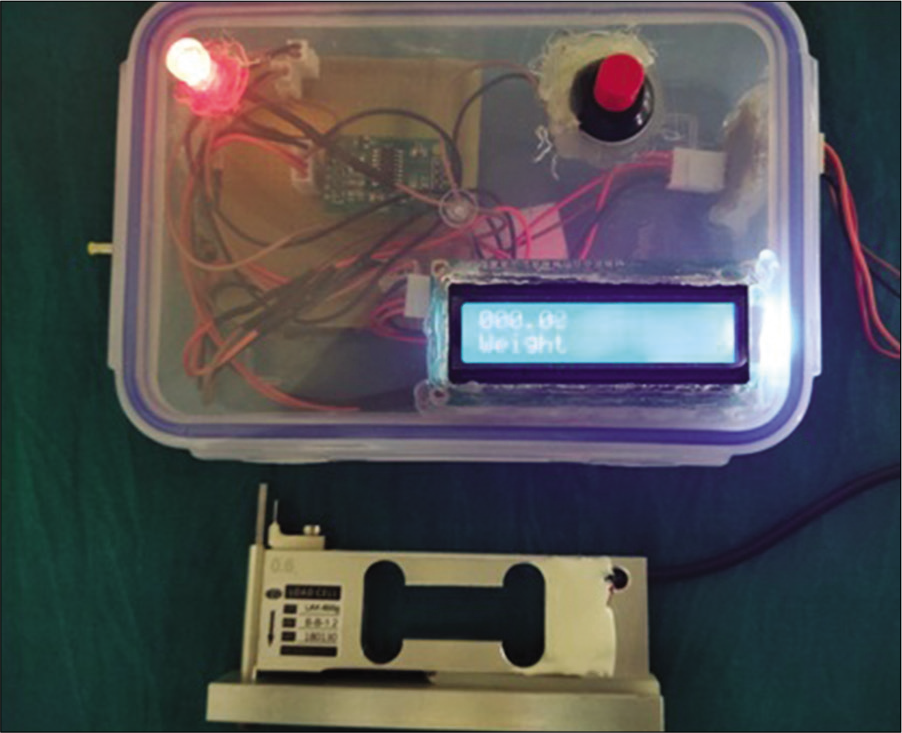
- ARDUINO-UNO circuit showing zero reading in display when reset red button is pressed and red led light indicator starts blinking.
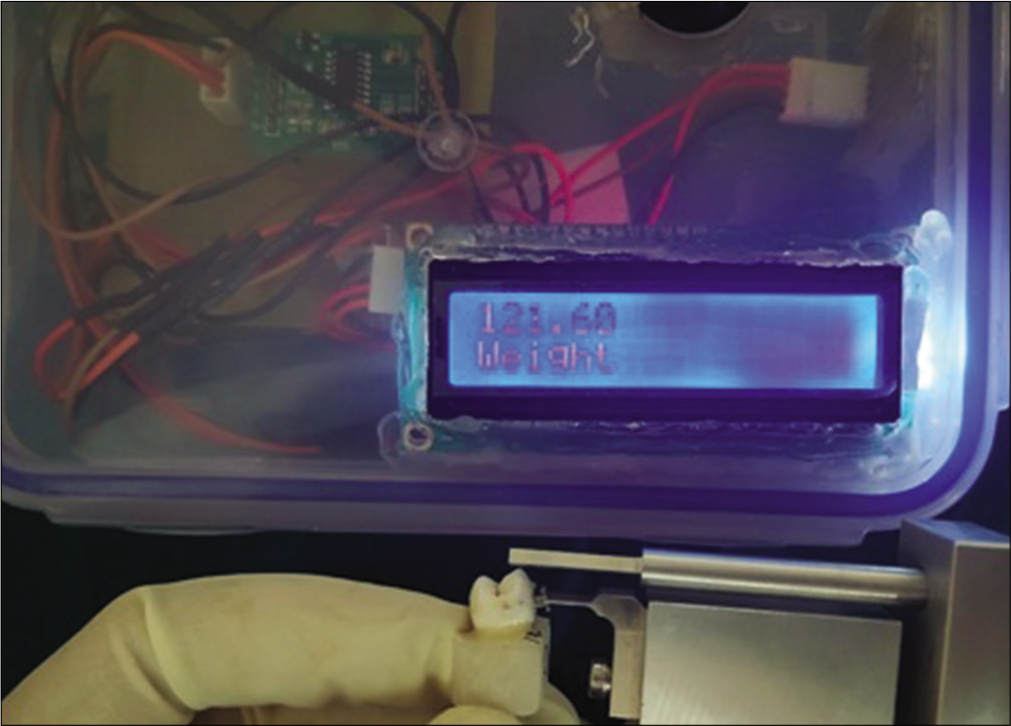
- Force sensing blade present inside the bracket slot with bonding force of 121 grams seen in display.
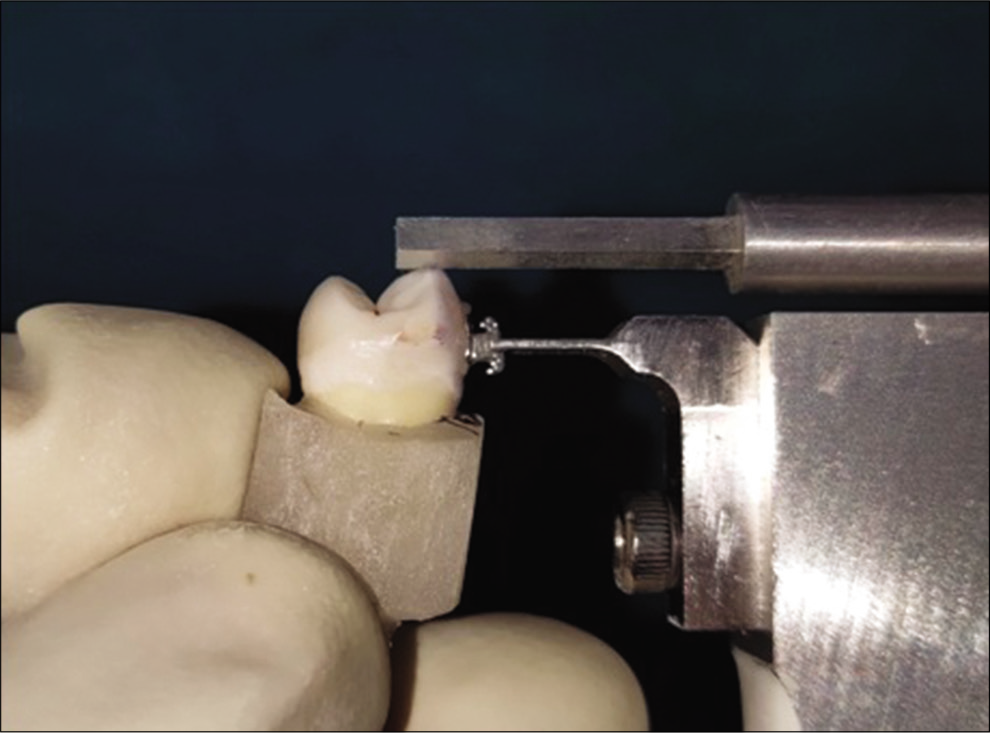
- Force sensing blade snugly seats into the bracket slot with vertical stopper passively in contact with cusp tip.
RESULTS AND DISCUSSION
The use of the prototype showed that the majority of orthodontists irrespective of clinical experience applied bonding force between the ranges of 50–200 g [Table 2]. The mean bonding force applied by participant orthodontists was similar in a time interval of 7 days with 134.67 g and 132.76 g respectively [Table 2]. Thus, the present instrument reveals a high probability of reproducibility of measured force as each participating orthodontist applied compressive bonding force used the instrument 5 times to bond bracket on the tooth surface, and the bonding force recorded every time was in the same range [Table 2].
| Bonding force applied by orthodontists | First measurement (T1) Mean Orthodontic bonding force (grams) | Standard deviation | Second measurement (T2) Orthodontic bonding force (mean) | Standard deviation |
|---|---|---|---|---|
| 1 | 105.45 | 12.45 | 109.35 | 10.32 |
| 2 | 175.82 | 19.35 | 168.45 | 13.57 |
| 3 | 90.45 | 6.45 | 94.76 | 8.35 |
| 4 | 87.50 | 8.28 | 93.32 | 12.30 |
| 5 | 142.35 | 11.35 | 133.70 | 14.45 |
| 6 | 187.54 | 14.55 | 178.45 | 15.28 |
| 7 | 138.45 | 12.30 | 149.30 | 11.45 |
| 8 | 201.45 | 25.75 | 182.35 | 16.79 |
| 9 | 51.79 | 4.20 | 55.48 | 4.89 |
| 10 | 165.90 | 13.60 | 162.46 | 15.68 |
| Total (Mean) | 134.67 | 12.82 | 132.76 | 12.30 |
This observational study not only recorded the amount of bonding force normally applied by orthodontists while bonding brackets but also helped in assessing the feedback about the usability of a newly designed prototype. Meanwhile, there were few investigations where researchers have evaluated the effect of bonding force on bond strength and adhesive thickness.
Muguruma et al.[8] used a custom-made epoxy model with a small force sensor at the left central incisor, a phantom model, and a sensor interface connected to a computer for analysis. They concluded that a big variation in bonding force values was obtained with the direct bonding and indirect bonding techniques and a force of around 200 g might be preferable for attaining a thin composite resin layer and for avoiding insufficient composite resin paste on the bracket base.
Similar studies were done by Goto et al.,[4] Jain et al.,[5] and Montasser et al.[7] where they assessed the impact of compressive force on the adhesive thickness and its effect on shear bond strength using a force gauge or push-pull tension gauge. Thus, the outcome of these studies may not provide a precise effect of bonding force on bond strength as these instruments are primarily designed to measure the orthodontic force applied by elastics or springs. However, these investigations provide insight into the effect of compressive force on the adhesive thickness and paved the way for future research.
Similarly, Mohammadi et al.[6] studied the effect of different force magnitudes where he applied predetermined forces measured by a universal testing machine on brackets during the bonding. Although, force application using the Instron testing machine was a good attempt to study the effect of bonding force on adhesive thickness, but results thus obtained in this investigation were incomparable with the previous studies as the methodologies used were different.
As Chaiprasongsook et al.[9] concluded in their study that a well-controlled systematized test may provide a more meaningful comparison among shear debonding stress and ultimately can result in reliable bond strength. This again highlights the need to have a specialized orthodontic instrument that can directly measure the amount of force applied accurately while bonding bracket to tooth surface. Thus, the new bracket positioning gauge with force sensor was designed as none of the previous studies have used any specialized instrument for measuring the precise force level directly while bonding brackets.
Although, the previous studies[5-9] revealed that there is wide variation in the amount of bonding force ranging from 50 g to 1000 g. We found in the present study that orthodontists have applied force while bonding brackets on teeth between 50 and 200 g. Thus, this again highlights that there is wide variation in bonding compressive force which needs further research. We believe that an ideal bonding force level may help to achieve optimum adhesive thickness for clinically acceptable bond strength.[14]
CONCLUSION
The novel bracket positioning gauge with force sensor measures compressive bonding force which is reproducible. The mean compressive bonding force was found to be in the range of 50–200 g with an average of 133 g. It is important to quantify and find the optimum force required while bonding orthodontic brackets to the tooth surface to achieve ideal adhesive thickness to take full advantage of the pre-adjusted edgewise system.
Limitations
The present innovation needs further refinements to be useful in clinical settings. There is a need to conduct studies to find the ideal bonding compressive force needed to achieve optimum adhesive thickness for clinically acceptable bond strength.
Acknowledgment
We are thankful to Central Institute of Plastic engineering and technology, Ahmedabad, India, for providing technical support to manufacture customized parts of novel bracket positioner with force sensor.
Declaration of patient consent
Patient’s consent not required as there are no patients in this study.
Financial support and sponsorship
Nil.
Conflicts of interest
There are no conflicts of interest.
References
- The effect of adhesive type and thickness on bond strength of orthodontic brackets. Br J Orthod. 1992;19:35-39.
- [CrossRef] [PubMed] [Google Scholar]
- Bond strength of three orthodontic adhesives. Am J Orthod. 1981;79:653-60.
- [CrossRef] [Google Scholar]
- Orthodontics: Current Principles and Techniques (5th ed). Philadelphia, PA: Elsevier; 2011. p. :749-50.
- [Google Scholar]
- Effects of contact compressive force on bracket bond strength and adhesive thickness. J Orofac Orthop. 2020;81:79-88.
- [CrossRef] [PubMed] [Google Scholar]
- Determination of optimum adhesive thickness using varying degree of force application and its effect on shear bond strength: In-vitro study. Orthodontics (Chic). 2013;14:e40-9.
- [CrossRef] [PubMed] [Google Scholar]
- The effect of different force magnitudes for placement of orthodontic brackets on shear bond strength in three adhesive systems. J Clin Exp Dent. 2018;10:e548-54.
- [CrossRef] [PubMed] [Google Scholar]
- Effect of applying a sustained force during bonding orthodontic brackets on the adhesive layer and on shear bond strength. Eur J Orthod. 2011;33:402-406.
- [CrossRef] [PubMed] [Google Scholar]
- Force and amount of resin composite paste used indirect and indirect bonding. Angle Orthod. 2010;80:1089-94.
- [CrossRef] [PubMed] [Google Scholar]
- 2021. Instrumentation Tools. Available from: https://instrumentationtools.com/load-cell-working-principle [Last accessed on 2022 Jan 21]
- [Google Scholar]
- Load Cell. 2021. Wikipedia Foundation. Available from: https://en.wikipedia.org/wiki/Load_cell [Last accessed on 2021 Dec 21]
- [Google Scholar]
- Arduino Uno. 2021. Arduino Uno. Available from: https://store.arduino.cc/usa/arduino-uno-rev3 [Last accessed on 2021 Dec 21]
- [Google Scholar]
- Arduino Uno. 2021. Wikipedia Foundation. Available from: https://en.wikipedia.org/wiki/Arduino_Uno [Last accessed on 2021 Dec 21]
- [Google Scholar]
- The effect of adhesive-layer thickness on bond strength. J Clin Orthod. 1992;26:718-20.
- [Google Scholar]


